I recently wrote an application to demonstrate some of the capabilities BoofCV on Android. BoofCV is an open source computer vision library that I’m working on written entirely in Java. The v0.13 update to BoofCV added functions for converting NV21 images (camera preview format) into BoofCV data types and provided Android specific visualization code. The end result is that it is now easier to write fast real-time image processing applications on Android using BoofCV. The source code for the demo application has also be released without restrictions.
General Tips
- Cell phone cameras are poor quality and suffer from motion blur and rolling shutters.
- Everything will work better when viewed with good lighting, allowing for faster shutter speeds.
- When selecting images for association you can swipe to remove previous selection. Also try tapping and double tapping.
- Image mosaic and stabilization work best when viewing far away objects, pure rotations, and planar surfaces.
- When tapping the screen to capture an image, do so gently or else the image will be blurred.
- On slower devices, pressing the back button to leave a slow process can crash the app and require you to manually kill it.
- Changing the camera preview size to “large” images can cause out of memory exceptions.
Camera Calibration

Detected square grid pattern. Red dots show calibration points.
Camera calibration is required for 3D vision applications. It will allow radial lens distortion to be removed and other intrinsic camera parameters to be known. To calibrate the camera print out a calibration grid and follow the general instructions from the link below. Note that the printed image can be rescaled for this application.
http://boofcv.org/index.php?title=Tutorial_Camera_Calibration
After you have printed the calibration target, take pictures of it (by gently tapping the screen) from at least 5 different views and angles. Most of the pictures should be taken from about 30 degree angle. When you are done taking pictures, press the “Compute” button to find the intrinsic parameters. When taking pictures it is recommended that you are sitting down on the ground holding your Android device with both hands. This is more stable and reduces motion blur, greatly reducing the frustration factor. Try to fill as much of the screen as possible with the calibration target and if one looks like it might be blurred click the remove button. On my Sampson Galaxy S3 and Droid 2 I get about 0.2 pixels mean error on good runs and more than a pixel error when things go badly.
Stereo

Stereo depth image computed from two views of the same object. Warmer colors indicate closer objects and color farther away.
Stereo vision allows the scene’s 3D structure to be computed. This is accomplished using a single camera using taking pictures of the same object two times from two different points of view. Camera calibration is required before stereo vision can be computed since lens distortion must be removed. On a Droid 2 cell phone (phone from around 2010/2011) the whole process can take 25 seconds or so, but on a Galaxy S3 (phone from 2012) it only takes four seconds.
To compute a stereo depth image first tap the screen to take a picture. Then move the camera left or right with a little rotation, up/down, and forwards/backwards motion as possible. How far you should move the camera depends on how far away the objects are. For close objects 1cm is often good and for objects a few feet away (1 meter) 3cm/1inch works well. Moving the camera too much tends to be a more common mistake than moving it too little. It will probably take you a few tries to get a good image. Also make sure the scene has good texture or else it won’t work.
Video Mosaic
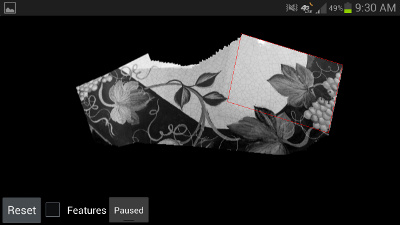
Mosaic created by moving the camera over a flat table top.
Creating a good mosaic can be difficult, with motion blur being the primary culprit. There is a reason why image stitching software on Android devices use still images. However with some practice and the right environment you can get some good results. See the image above.
Remember that it won’t work if you are close up to a complex 3D scene and translating the camera. Instead try pivoting the camera or working off of far away objects. Slowly moving the camera also helps.